Posts

Multiple Python versions on MacOS

# Install homebrew Homebrew is a package manager for MacOS, must have CLI utility. $ /bin/bash -c "$(curl -fsSL https://raw.githubusercontent.com/Homebrew/install/HEAD/install.sh)" # Install latest python MacOS comes with a python version but you should install the latest stable version of python. $ brew install python # Install pip First of all download the get-pip file $ curl https://bootstrap.pypa.io/get-pip.py -o get-pip.py Now run this file to install pip $ python get-pip.py # Change global default python to latest python $ sudo ln -s -f /usr/local/bin/python3.9 /usr/local/bin/python # Install pyenv pyenv makes it easy to install, manage, and switch between multiple Pythons versions. $ brew install pyenv # Install multiple python versions in pyenv $ pyenv install 3.9.4 $ pyenv install 2.7.16 # Change default python in pyenv to latest and greatest $ pyenv global 3.9.4 # Running pyenv $ pyenv versions $ python -m venv venv $ source ./venv/bin/activate (venv) $ which pyth

Setting up AWS CLI profiles

Follow instructions here to create or update your credential file. https://docs.aws.amazon.com/cli/latest/userguide/cli-configure-profiles.html  Use  $export AWS_PROFILE= default to change your profile.

Installing CloudCustodian for AWS

Cloud Custodian is a rules engine for AWS fleet management. It allows users to define policies to enable a well managed cloud infrastructure, that's both secure and cost optimized. It consolidates many of the adhoc scripts organizations have into a lightweight and flexible tool, with unified metrics and reporting. Why this post? Cloud Custodian installation instructions from their Github page simply tell you following commands which did not work for me. $ virtualenv --python=python2 custodian $ source custodian/bin/activate   (custodian) $ pip install c7n Hence i noted down a more comprehensive installation instructions that worked. Assumptions. Python is already installed which includes a pip version installed as well. But we need to upgrade pip first. Installation instructions with failed commands and fixed actions. 1. Install homebrew $ /usr/bin/ruby -e "$(curl -fsSL https://raw.githubusercontent.com/Homebrew/install/master/install)" 2. Update PIP

Decoding AWS console error messages

aws configure   - (enter your access key and secret access key) aws sts decode-authorization-message --encoded-message [encoded error message]

Installing Python Boto3 for AWS on MacOS

Image
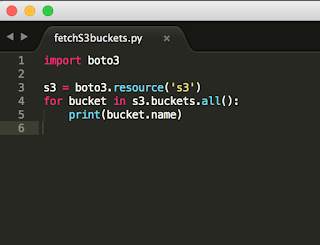
Boto3 is a Python library to interact with AWS APIs via command line. It works by leveraging AWS APIs in the backend and provides an easy interface to perform AWS actions like "Launch that shit" or "Trigger a lambda function to automate that shit".  Installation on MacOS is as simple as following these steps. Install Python Install PIP (Python package manager) $ curl -O https://bootstrap.pypa.io/get-pip.py $ python3 get-pip.py --user Install AWS CLI $ pip install --user --upgrade awscli   Update path (Or, add following to your .bash_profile using $ sudo nano ~./bash_profile ) $ export PATH=~/Library/Python/2.7/bin/:$PATH   Check if AWS CLI is installed correctly, $ aws --version Update AWS config file with access keys, $ aws configure AWS Access Key ID: AWS Secret Access Key ID: Default region name: Default output format: Install boto3   $ sudo pip install boto3 Test boto3. Create a te

Basic GIT commands

Git command line is easy. Too easy in fact once you understand it. After fiddling with multiple resources, I found these to be the simplest commands to get the job done. Here it is! Clone a git repo locally $ git clone <url> Update an existing cloned repo $ git pull Add a new file to the git repo $ git add <filename> $ git commit -m <message> <filename> $ git push For more:  https://confluence.atlassian.com/bitbucketserver/basic-git-commands-776639767.html